Grungy and Grainy Technique


The latest look in photographs is the grungy and grainy look. You can achieve this effect in many ways. You can buy an expensive software program for hundreds of dollars or learn how to do it for free. This effect is most likely a fad and will disappear in time, but if you want to keep up with the trends and can’t run out and buy the latest and greatest software program to do this technique. All you need is CS3 and a few minutes of your time. Open your image document in CS3 and in your layers palette make a duplicate layer of the original image.
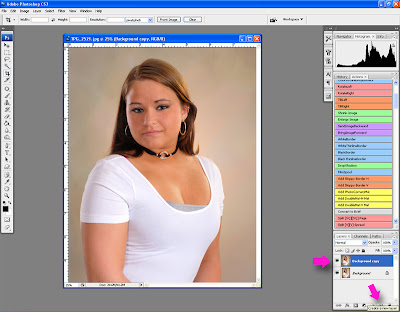
Now with your duplicate layer active click Filters on the tool bar at the top and Convert for Smart Filters.


This will give you the ability to go back and readjust your image later if needed. Now click on Image>Adjustments> Shadow/Highlights.


Move the shadows slider to the right to about 75-80. Then move the Highlights slider to the right to about 25 and click ok.


In the layers palette click create a new layers adjustment and then click Black and White.


The general default black and white grayscale will be fine here, click ok. Now make this an overlay instead of normal layer.
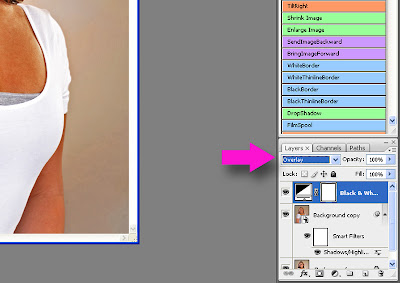


The image now changes back to color. Now create another adjustment layer and do the Black and White again. This time you need to select your preference from the drop down menu. Try all the settings and see what you like best. In this case I chose the green filter and clicked ok.


Change this layer to overlay also. That is good for the grunge now add some grain. Make a new layer.


Use your paint bucket tool and cover the entire image with a nice neutral gray like the gray in the desk top background.


Go to filters and Add Noise.


Set the slider to about 25-35. Select Gaussian and Monochromatic and click ok.


Now reduce to opacity of this layer down to about 29% and change it to overlay.

For one last final touch go to Filters>Distort>Lens Correction.


Slide the vignette slider all the way to the left to darken and click ok.


Your finished image should look like this.


If it doesn’t you can go back and readjust any layer until you get the desired effect. Experiment with this technique and develop your own style. Landscapes may need less or more depending on your exposures and tastes.


Photo Restoration

This restoration was in fairly good shape except for the color fade on it. The client needs us to enlarge it from a 3x3 in. print to an 8x8 in. print. The color could be restored but would be time consuming and costly so we decided to go with a sepia toned print. This will keep our period look and be cost effective . After enlarging and re toning the image, it had some minor spotting that needed cloned out and the image is ready to print. Click to enlarge.

Model Shoot


Yesterdays photo shoot was with a wonderful young woman named Madeline. Madeline is looking to add some interesting images to her modeling portfolio. She likes the " Bond Girl " look with the silhouette images so we did a few in studio. Basically, I lit the back ground with a few stops of over exposure and just added no light to the subject. This makes your subject black and the background go white. I add some artistic touches with CS3 and get a get look. The top photo is our model with lighting and as you can see she doesn't need to hide in silhouette and has a very contagious smile.


December Special

This month get $10 off any purchase with this coupon. Just double click the coupon then print it out.

Happy Thanksgiving

Thanksgiving with family and friends. Every year I make a special effort to take a group picture at Thanksgiving. I started in 2006 and plan on doing it until I can't. This is the third in my series and its amazing how you can compare them and see how we've changed as a family in such a short period. Most obvious is the addition of my grandson Nathan. It will be interesting to see how we look in 2020. I recommend all families do a group picture like this at least once a year.

Holley Falls, Holley, NY


I like to shoot waterfalls. At this time of year it is always questionable that any given waterfall will have water flowing over it or possibly be frozen for the smaller ones. I chose Holley Falls because it is really a run off outlet for the Erie canal and always has a good flow all year long. I had a light dusting of snow this day and the mist from the falls was freezing along the banks. the sun was in and out of clouds and the falls was hidden in shadow. I used HDR methods to merge multiple images in Photomatix to give me the best exposures in highlight and shadow areas.
This image was in decent shape for its age. I was glad the tear didn't cut into the eyes or mouth on this one. An easy fix, clean up and clone two large rips. Spot for dust and adjust contrasts and color levels and this photo is done.

Another restoration

In this case our client wished us to restore and enlarge her cherished childhood photo. The original image is a small 2x2 inches. It also has many tiny cracks and some scratches. Fortunately the scratches do not run across the face. The final image was made into an 8x10 including the added mat. The image cleaned up fairly nice considering the original image was in rough shape. Click on image to enlarge.

Restoration Project

In this restoration our client would like the image retouched and enlarged. The original photo was 2.25 inches by 2.25 inches. Very small indeed. I first make a copy of the original as I do with all my restorations by photographing it with my Nikon D3 then uploading the image to NX2. I then adjust the contrast and black and white tones and do any straightening of my project. It is then transferred to CS3 and I do most of the retouching and dust spotting with the patch tools. I then increase the size and add a mat border to make the final image 5x7.

A couple more of Nathan with his hat. Wendy thinks he looks like a little old time paper boy in these. One has to admit he captures your heart with sweet innocence. All images were shot with Nikon D3, 24-70 mm lens. In studio set up with four strobes.

Nathan Daniel Muth, 8 mos


Today we did a photo session with my grandson. Nathan wore his Christmas outfit. He was adorable. I used a green screen for a background so I could change it to what ever I wanted later. Nathan was very cooperative an I got some great expressions. Here are a few from his session that I really liked. Click on images to enlarge.

November Special

Our November special this month is for high school seniors. Use the pass code below and receive a 10% discount on your senior pictures in the month of November.
Pass Code is: SENIORS

Happy Halloween


Today is the last day of the month and that means it is Halloween. The spookiest scariest day of the year. The Portrait Gallery and its staff hope you have a fun, happy and safe day. Enjoy!
Trying out a new background today. I went to home depot and picked up this material used for vents. It is light weight plastic and has a cool texture. I used two speedlights with colored gels to light it. I like the way the light reflects off the texture and with a little experimenting this will be a good high school senior background.
In keeping with our Halloween themes this week and inspired by the Adams Family. I re created " Thing ". I shot this in studio using two speedlights. It shows what a little technique and some imagination can do for your photography.

Lighting Lesson 06


Here is a cool effect and it was so simple to do. I placed a Nikon Speedlight SB 600 under an orange plastic bowl and triggered the flash from camera position with Nikon SU800 commander. I under exposed the room lights to make the over all image darker. I achieved an eerie type Halloween look. Click on image to enlarge.

Halloween Prank

Halloween is getting closer. I was feeling creative today and a little devilish. My oldest daughter Lisa likes to prank people, and I guess so do I. She is scared to death of this doll because it looks exactly like her Mother. She says it is too creepy. I used the doll as my main subject and lit it eerily then added fog in the background. Now I had kind of a creepy looking picture but it needed more. Then I remembered I took a picture of a cool doorway this past summer. After cutting out the doors in CS3 I had a very scary looking entrance way. I added the doll picture to the doorway. Then darken the area arount the outside to give the effect of night I sent this pcture to Lisa's apartment with the caption " Don't forget to trick or treat at my house this year". If this doesn't give Lisa nightmares I don't know what will. Whooooooooooo!

Easily color the background with gels

This still life was taken today. I used Creative Lighting System to sculpt the light to give the vase some dimension. I used a black sheet for the background and lit it with one SB 600 with an orange gel shot through a grid to get the subtle harmonizing effect. With colored gels I can effectively change the black background to almost any color I need.


Colors of Autumn


We got another opportunity to get out and shoot some fall foliage this weekend. Our trip took us to Letchworth State Park. The trees were just past peak season but still had plenty of color to enjoy. The park was saturated with photographers capturing the last bits of autumn before the season changes. Here are a few from our trip. Click to enlarge.


This interesting image was designed in photoshop using layers and transform tools. I haven't found a use for this , but I am sure it will have a function in some creative project down the road.
I had a chance to try out multiple lighting at Friday nights reception. I used the Nikon CLS ( creative lighting system) . I had two Nikon SB 600 speedlights bouncing towards the ceiling along the wall on the right and a Nikon SB 800 as master on camera. The 600's were set at ttl and one stop over. The master 800 was ttl and used for fill. The red lights from the left side are from the DJ's booth with disco lights. I think the image has a nice natural look to it.

Congratulations John and Karen


We had the pleasure of photographing the wedding of John Steckstor and Karen Kozacki. What a wonderful couple and they have great families too. The ceremony was at Redeemer Lutheran Church in North Tonawanda and the reception was at the Canal Side Restaurant in Lockport.
Everyone had a blast at their reception. A great time for all. Here are a few of my favorites from the day.

When I need to unwind I like to go into CS3 and create new things. This image was completely made up using tools in CS3. The really great thing about CS3 is your only limited to your imagination. The sky is the limit. This technique is quite advanced but I will giving photoshop tutorials in this blog. Stay tuned for future lessons and assignments. Click on image to enlarge.

Lighting Lesson 05


This beautiful outdoor portrait was done easily with two nikon speedlights. As the diagram above shows I sat my subject down with the sun shinning at her from behind and to camera right. I added one SB 600 in a soft box as a main light to camera left. I then used my SB 800 on camera as a fill and master. Both flashes are set to ttl mode. The camera is set to manual and I under expose the background by -2 stops. I have to use +2 on the main light to compensate for the soft box and +.07 on the fill because I used Gary Fong's Lightshere pointed directly at the subject. The result is a perfectly exposed background with a subject that pops out of the picture with great wrap around modeling light.

Lighting Lesson 04


Simple lighting techniques and attention to details will give you great results. Today my self assignment was to take a simple household article, light it and make it interesting. In this case tasty, I hope. I started with a tea cup and saucer and placed them on glass suspended on a small table top with books. I like this technique because it affords you opportunity to light your subject from below if you want. In this particular case I used a SB 600 in a soft box at ttl +1 for my main light. I used one SB 800 on camera bounced behind me set on ttl +1 as a fill light. I then added one SB 600 with CTO gel and a gobbo set at ttl -1 to light my background. The gobbo is used to restrict light spill on my subject. I used the hottest tea possible to my tea cup but I still didn't have the steaming hot tea effect I wanted. I took the image and then added the steam in photoshop with layers. I handheld my Nikon D3 and used iso 640. Camera settings were f-16 at 1/80th sec. using 24-70mmAF-S mm Nikkor lens set to 70mm. Click on image to enlarge and you will see the faint hint of steaming hot tea for a most realistic look.

Autumn Foliage

Saturday Wendy and I took a ride to Kindzua Dam in Pennsylvania. The leaves still haven't turned color and probably need another 2 weeks to peak. The trip was still worth the effort. It was perfect weather and the scenic vistas were wonderful. The image above was of the Allegheny Reservoir and a good example. Click on image to enlarge.

A different look...

Here is a great technique I learned from the strobist at http://strobist.blogspot.com/. I set my cameras white balance to incandescent. Camera set to iso 100 at 1/250th sec. at 6.3 which is exactly -2 stops less then the sunlight coming in from the right of my subject. I then added an orange gel to a SB 600 set at ttl +.03 as my main light and another SB 600 rim lighting the left side of my subject. This added blue cast to my image but left my subjects skin normal. Cool look don't you think?

Fall Harvest


Beautiful skies are over Niagara County today. Autumn is here and the fall colors are approaching quickly. I plan on getting out to shoot some fall foliage this weekend.