Events Music

A good friend of my mine, Dave Miller has had his website redesigned and it is up and running now. It is really outstanding and well done.


You need to check it out at this link: http://djthedeejay.net/main.html
See Dave for all your entertainment needs. With twenty seven years of experience and satisfied customers, he must be doing something right. Give them a call today at 297-4413 and tell them Gary sent you.

Winter wonderland

Slow day today so after digging out I took a quick ride downtown to Goat Island. The winter wonderland spectacular of Niagara is in full force. The trees are covered with snow and ice. Everywhere you look is a scenic picture. I shot this couple holding hands and enjoying a walk together on a winter day. I can only wonder what their story is. Maybe lovers, maybe on their honeymoon, maybe married, or just tourists visiting Niagara for the first time. Almost all the attractions are closed in the winter months ( cave of the winds, maid of the mist, etc. ) but winter at the Falls is worth the trip.

Photoshop effort...

My latest creation. Anyone who has ever been to a casino knows there is no photography inside.I have been working on this concept with dice and I needed more than a photograph of just a pair of dice. So I started with some wire and a glue gun and glued the dice to a thin wire and photographed then looking like they are flying thru air. Then later removing the wires in photoshop. The image was well lit and looked good but I wanted something more. So I meticulously constructed the craps table in photoshop. Complete with the rubberized looking back board, mirrors, and chips. Now I had a better image but I needed a reason for the dice flying thru air. So I went into the studio and photographed my hand in a simulated dice throwing motion and added it too. The final image was then stroked and border added and will be submitted for gallery print competition. Lets hope all the work and planning pays off. Click on image to enlarge.

News Bulletin

On Tuesday evening Gary was elected vice president of the Buffalo Niagara Professional Photographers. The PPSNYS is a non profit organization devoted to a strong code of ethics in photographic excellence and dedicated to professional performance from all its members. Our Buffalo Niagara group is one of eleven sections comprising the entire state of New York. Meetings are held monthly and include the latest updates and training on the business of photography.

Congratulations too... John & Tonia

We did engagement portraits for Tonia Hillman and John Itzo today. A wonderful couple who plan to wed this summer on Saturday, July 25, 2009. John and Tonia relaxed and were very comfortable in front of the lens. We got plenty of great images for them to enjoy. I will add some of these to their album after the wedding.
My grandson Nathan is taking after his dad and becoming a huge Miami Dolphin fan. HaHa...maybe not when he grows up and comes to his senses he will be a Buffalo Bills fan.


More macs for down under

Contrary to popular belief, good macro photography is very difficult to achieve. The equipment used is very different from what standard portrait photographers use. I am just a beginner in this field so I have started out easy with a diopter lens which fits easily to most of the lenses I already have. Once I master this I will probably progress into reversal rings and maybe a high quality macro lens. The diopter gets me in the range of some good macro photography like I am interested in but as I continually tell you...it's all about the light. Properly lighting a subject you can barely see is very tricky and takes lots and lots of illumination to light your scene. Not only is light a major issue but your subject needs to be in focus and if your subject is an insect...yikes they move fast and depth of field is also a problem. Then there is the background to consider. And to make matters worse there is a dust issue to think about too. Way more skill and thought goes into a good shot than I ever imagined. The image above is a really close up view of broccoli sprouts. As you can see I am just a beginner but I plan on getting better.

Close up

Close up image of a pencil tip. I can not emphasize the importance of lighting. It makes no difference what camera brand you use. Lighting is the language of photography. Learn all you can about it. Learn to read it, see it and understand it. Without it you have no image. This macro was made better because it was lit properly. The subject is lit well with shape and dimension and it stands out from the background for separation. Learn and practice your lighting skills as often as you can and your photography will improve tremendously.

Macro Photography


I started doing some macro photography. I am using a Raynox 250 video lens on a nikkor 28-105 mm lens. When shooting macros it is very important to light your subject properly. The raynox lets me be far enough away from my subject ( 6 in. ) to get light on it. The images above of some Irish coins ( 20 pence, 50 pence, one shilling )were lit with one sb-800 speedlight from camera right.


Nuthatch


Welcome to the new year. I hope your holiday season was joyous and safe. I took these images of a nuthatch at Goat Island over the holiday break. Isolate your subject for the best results when shooting birds. In these I used a long lens at 200mm to compress the backgrounds and add blur. This separates my subject from the background and makes the nuthatch stand out.


Today in the midst of the holiday hustle and bustle , Wendy and I decided we'd had enough and took a relaxing ride to Goat Island. We stopped at the parking area by the three sister's island and fed the birds. We had all kinds of varieties come down and feed right from her hand. I was hoping a cardinal would come in close but no such luck. It was fun to watch them and we had a great time.

Birding... for the fun of it.


Birds make interesting and beautiful subjects. I shot this cardinal yesterday. Such a magnificent bird. This male decided to come closer and check me out. Maybe looking for some food or just checking to see if I was a threat. Either way he was close enough to capture these wonderful images of him. By intentionally blurring out the background it gives my subject good separation and adds dimension to my image. Click on image to enlarge.

Happy Holidays

Season's Greetings from The Portrait Gallery. Photoshop isn't just for photos anymore. I made this card entirely from scratch in photoshop. Adobe tools allow you to use your imagination with no limits. It is such a fascinating program to use. The Portrait Gallery will be closed December 24th til Jan. 02, 2009 for the holidays and maintenance shut down. If you are planning ordering prints and need them for Christmas you better get your orders in soon. The dead line is December 22. Please have a happy and safe holiday season. Thank you for all your business. Merry Christmas and Happy New Years.

Congratulations to...


Steven McGinnis and Cynthia Sweney announcing their engagement and plan a June 2009 wedding. They came in for portraits and had a great time. A fun couple and definitely in love. We will be looking forward to shooting their wedding.

Nikon D3... WoW factor is?

The subject matter of this image is nothing spectacular. Just an average Christmas tree ornament. What is spectacular is the fact that this image was hand held ( no tripod ) and shot at iso 25,600 and in jpg. format. Some noise reduction and sharpening was added in NX2. Click on image to enlarge.

Grungy and Grainy Technique


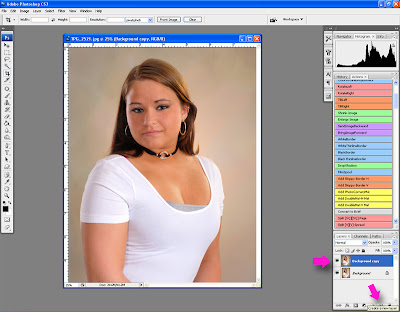
The latest look in photographs is the grungy and grainy look. You can achieve this effect in many ways. You can buy an expensive software program for hundreds of dollars or learn how to do it for free. This effect is most likely a fad and will disappear in time, but if you want to keep up with the trends and can’t run out and buy the latest and greatest software program to do this technique. All you need is CS3 and a few minutes of your time. Open your image document in CS3 and in your layers palette make a duplicate layer of the original image.

Now with your duplicate layer active click Filters on the tool bar at the top and Convert for Smart Filters.


This will give you the ability to go back and readjust your image later if needed. Now click on Image>Adjustments> Shadow/Highlights.


Move the shadows slider to the right to about 75-80. Then move the Highlights slider to the right to about 25 and click ok.


In the layers palette click create a new layers adjustment and then click Black and White.


The general default black and white grayscale will be fine here, click ok. Now make this an overlay instead of normal layer.
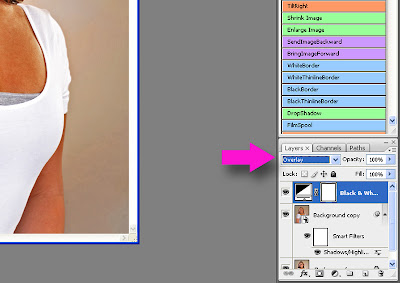


The image now changes back to color. Now create another adjustment layer and do the Black and White again. This time you need to select your preference from the drop down menu. Try all the settings and see what you like best. In this case I chose the green filter and clicked ok.


Change this layer to overlay also. That is good for the grunge now add some grain. Make a new layer.


Use your paint bucket tool and cover the entire image with a nice neutral gray like the gray in the desk top background.


Go to filters and Add Noise.


Set the slider to about 25-35. Select Gaussian and Monochromatic and click ok.


Now reduce to opacity of this layer down to about 29% and change it to overlay.

For one last final touch go to Filters>Distort>Lens Correction.


Slide the vignette slider all the way to the left to darken and click ok.


Your finished image should look like this.


If it doesn’t you can go back and readjust any layer until you get the desired effect. Experiment with this technique and develop your own style. Landscapes may need less or more depending on your exposures and tastes.


Photo Restoration

This restoration was in fairly good shape except for the color fade on it. The client needs us to enlarge it from a 3x3 in. print to an 8x8 in. print. The color could be restored but would be time consuming and costly so we decided to go with a sepia toned print. This will keep our period look and be cost effective . After enlarging and re toning the image, it had some minor spotting that needed cloned out and the image is ready to print. Click to enlarge.

Model Shoot


Yesterdays photo shoot was with a wonderful young woman named Madeline. Madeline is looking to add some interesting images to her modeling portfolio. She likes the " Bond Girl " look with the silhouette images so we did a few in studio. Basically, I lit the back ground with a few stops of over exposure and just added no light to the subject. This makes your subject black and the background go white. I add some artistic touches with CS3 and get a get look. The top photo is our model with lighting and as you can see she doesn't need to hide in silhouette and has a very contagious smile.


December Special

This month get $10 off any purchase with this coupon. Just double click the coupon then print it out.

Happy Thanksgiving

Thanksgiving with family and friends. Every year I make a special effort to take a group picture at Thanksgiving. I started in 2006 and plan on doing it until I can't. This is the third in my series and its amazing how you can compare them and see how we've changed as a family in such a short period. Most obvious is the addition of my grandson Nathan. It will be interesting to see how we look in 2020. I recommend all families do a group picture like this at least once a year.

Holley Falls, Holley, NY


I like to shoot waterfalls. At this time of year it is always questionable that any given waterfall will have water flowing over it or possibly be frozen for the smaller ones. I chose Holley Falls because it is really a run off outlet for the Erie canal and always has a good flow all year long. I had a light dusting of snow this day and the mist from the falls was freezing along the banks. the sun was in and out of clouds and the falls was hidden in shadow. I used HDR methods to merge multiple images in Photomatix to give me the best exposures in highlight and shadow areas.
This image was in decent shape for its age. I was glad the tear didn't cut into the eyes or mouth on this one. An easy fix, clean up and clone two large rips. Spot for dust and adjust contrasts and color levels and this photo is done.

Another restoration

In this case our client wished us to restore and enlarge her cherished childhood photo. The original image is a small 2x2 inches. It also has many tiny cracks and some scratches. Fortunately the scratches do not run across the face. The final image was made into an 8x10 including the added mat. The image cleaned up fairly nice considering the original image was in rough shape. Click on image to enlarge.

Restoration Project

In this restoration our client would like the image retouched and enlarged. The original photo was 2.25 inches by 2.25 inches. Very small indeed. I first make a copy of the original as I do with all my restorations by photographing it with my Nikon D3 then uploading the image to NX2. I then adjust the contrast and black and white tones and do any straightening of my project. It is then transferred to CS3 and I do most of the retouching and dust spotting with the patch tools. I then increase the size and add a mat border to make the final image 5x7.

A couple more of Nathan with his hat. Wendy thinks he looks like a little old time paper boy in these. One has to admit he captures your heart with sweet innocence. All images were shot with Nikon D3, 24-70 mm lens. In studio set up with four strobes.